As of: 29.12.2024, Plugin Pro Version 2.2.1
1. Introduction
Quick User Reminder is a simple plugin for Joomla! 3, Joomla! 4 and Joomla! 5 that reminds users of inactive accounts automatically. You can individually configure the account types to be notified by specifying a time period. If user accounts match the type ('not activated', 'never visited' or 'idle account') and the selected period of time, the associated users are automatically reminded when a certain event occurs.
2. Requirements
Quick User Reminder is a Joomla extension, so you need to have a website that is built on Joomla. The plugin woorks with Joomla versions 3.9, 3.10, 4.x and 5.x. Please make sure that PHP 7.4+ is running on your webspace. You need one of the following databases: MySQL 8.0.13 or newer, MariaDB 10.2.1 or newer. If you use Joomla! 5.x, please activate the "Behavior - Backward Compatibility" plugin (if it is not already activated) before installing Quick User Reminder.
3. Installation & Updating
When you download Quick User Reminder from my site, you get a file that is called quickusercleaner_VERSION.zip. VERSION stands for the current version of the plugin, so the latest pro version would be quickusercleaner_pro_2.2.1.zip.
- Log in to the backend of your Joomla installation as a super administrator.
- Go to System and klick on Install → Extensions (in Joomla 3 use: Extensions → Manage → Install)
- Drag the file to the upload area or select the file via the upload button.
After the installation process is completed, you will be notified. Navigate to the plugin (System → Manage → Plugins or Extensions → Plugins in Joomla 3) and activate it. In Joomla! 5 Please check that the "Behavior - Backward Compatibility" plugin is activated.
If a newer version of the Quick User Reminder plugin is available for download, you will be notified in the Joomla backend. You can then install the latest version directly from Extensions: Update. If you're using the Pro version of Quick User Reminder , make sure you've entered a valid Download ID in the appropriate field. Alternatively, you can also download the latest versions from my website and install them as explained above.
4. Setup & Configuration
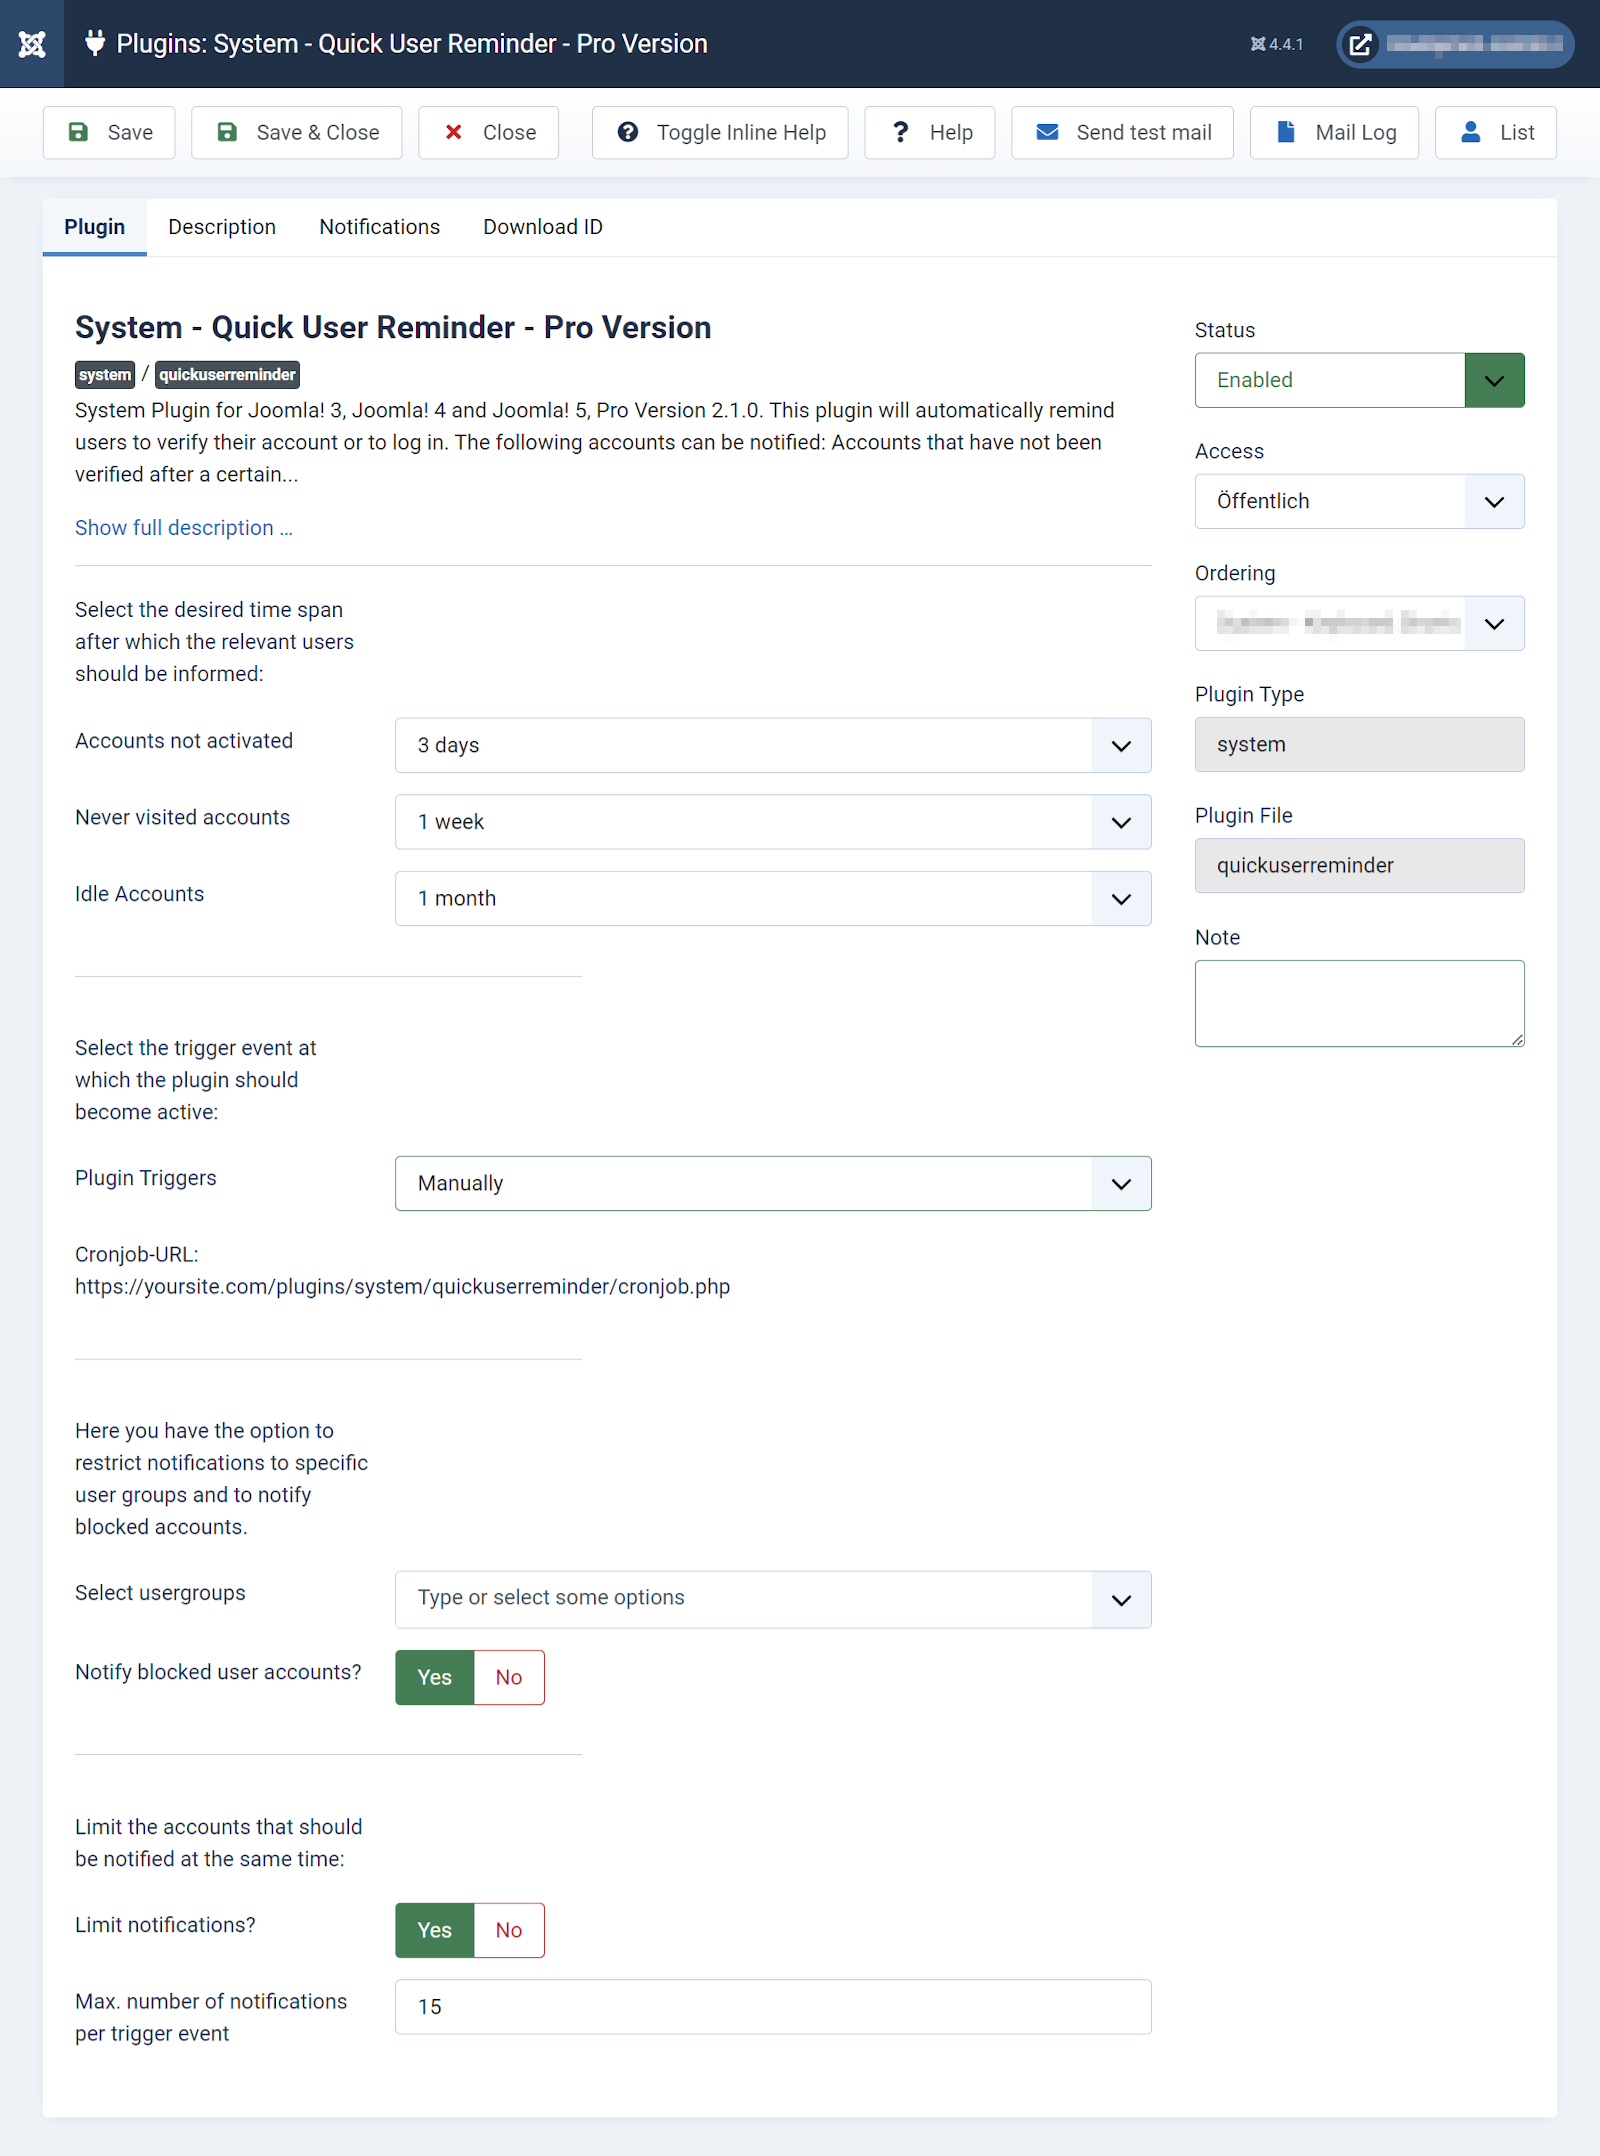
If you open the plugin settings you can configurate the plugin to your needs.

Time span after which the users should be informed
Select the desired period of time after which the users of the different accounts will be reminded. You can configure the following account types:
Not activated accounts: These are accounts that have been awaiting activation for longer than the configured period.
For example: A user registered at your page on 01/08/2022 and did not activate his account yet. You set a period of 3 days for that type of account. If the user has not activated his account by 04/08/2022 the user of the account will be reminded automatically by the plugin.
Never visited accounts: These are accounts that have been activated but never been visited; the user did not log in for a single time.
For example: A user registered at your page on 01/08/2022 and activated his account on 03/08/2022 but has never logged in to his account. You set a period of 1 week for that type of account. If the user does not log in to his account by 11/08/2022 (1 week after activation) the user of this account will be reminded automatically by the plugin.
Idle accounts: These are accounts that have been activated and visited, but the last visit is too long ago.
For example: user registered at your page on 01/08/2022 and activated his account on 03/08/2022 and did log in in 10/07/2022 for the last time. You set a period of 3 months for that type of account. If the user does not log in to his account again by 11/10/2022 (3 months after his last login) the user of this account will be reminded automatically by the plugin.
Plugin Trigger
Select at which event the plugin will act and notify users. You can select the following triggers:
- Manually *
- Login Backend Super User
- Login Backend Administrator *
- Login Backend Manager *
- Cronjob (not Joomla! 5) *
If an above mentioned user logs into the backend, the Quick User Reminder plugin will delete accounts, that meet the settings. The trigger setting 'manager' also includes 'administrator' and 'super user', 'administrator' includes 'super user'. If the option 'Manually' is selected, the remindin process must be started manually.
If the 'Cronjob' option is selected, the plugin will be started via a link. This link must be accessed via a cron job on your own web server (e.g. every day or once a week). The following link must be specified in the cron job:
https://[YOURSITE.COM]/plugins/system/quickuserreminder/cronjob.php
Replace [YOURSITE.COM] with the address of the Joomla! installation.
The advantage of a cron job is that it can be started automatically at regular intervals (at desired days and times) without requiring a login to the backend of the Joomla! installation. Since this runs in the background, there is no waiting time when logging in to sites with many users, unless a limit has been set. The limit can be increased or omitted when called by a cron job.
Restrict notifications
Restrict to usergroups: Here you can specify user groups whose users should be notified. If you leave this field blank, users from all groups (except 'super user', 'administrator' and 'manager') will be notified.
Notify blocked user accounts: Here you can set whether blocked user accounts should also be notified. This setting should always be enabled as it will notify users who have not yet activated their account. Only set this option to 'no' if you do not want to inform these users for good reasons.
Limit notifications
Limit the number of users who should receive an email notification at the same time. Setting a limit is useful if you have many user accounts on your website that should be notified. Since the Joomla mailer works quite slowly on some servers, it is necessary in such a case to limit the simultaneous sending of e-mails. In general, I recommend limiting notifications; you should notify a maximum of 20 users at a time.
To limit the notifications, set Limit notifications to YES and enter a desired value in the field below. After you have saved the settings, only the desired number of notifications will be sent per trigger event (i.e. login of the user specified under Plugin trigger). If other users are notified, they will receive the email at the next trigger event.
If you have chosen 'Cronjob' as the trigger, you can turn off the limit or increase the maximum notifications per trigger call
5. Notifications *
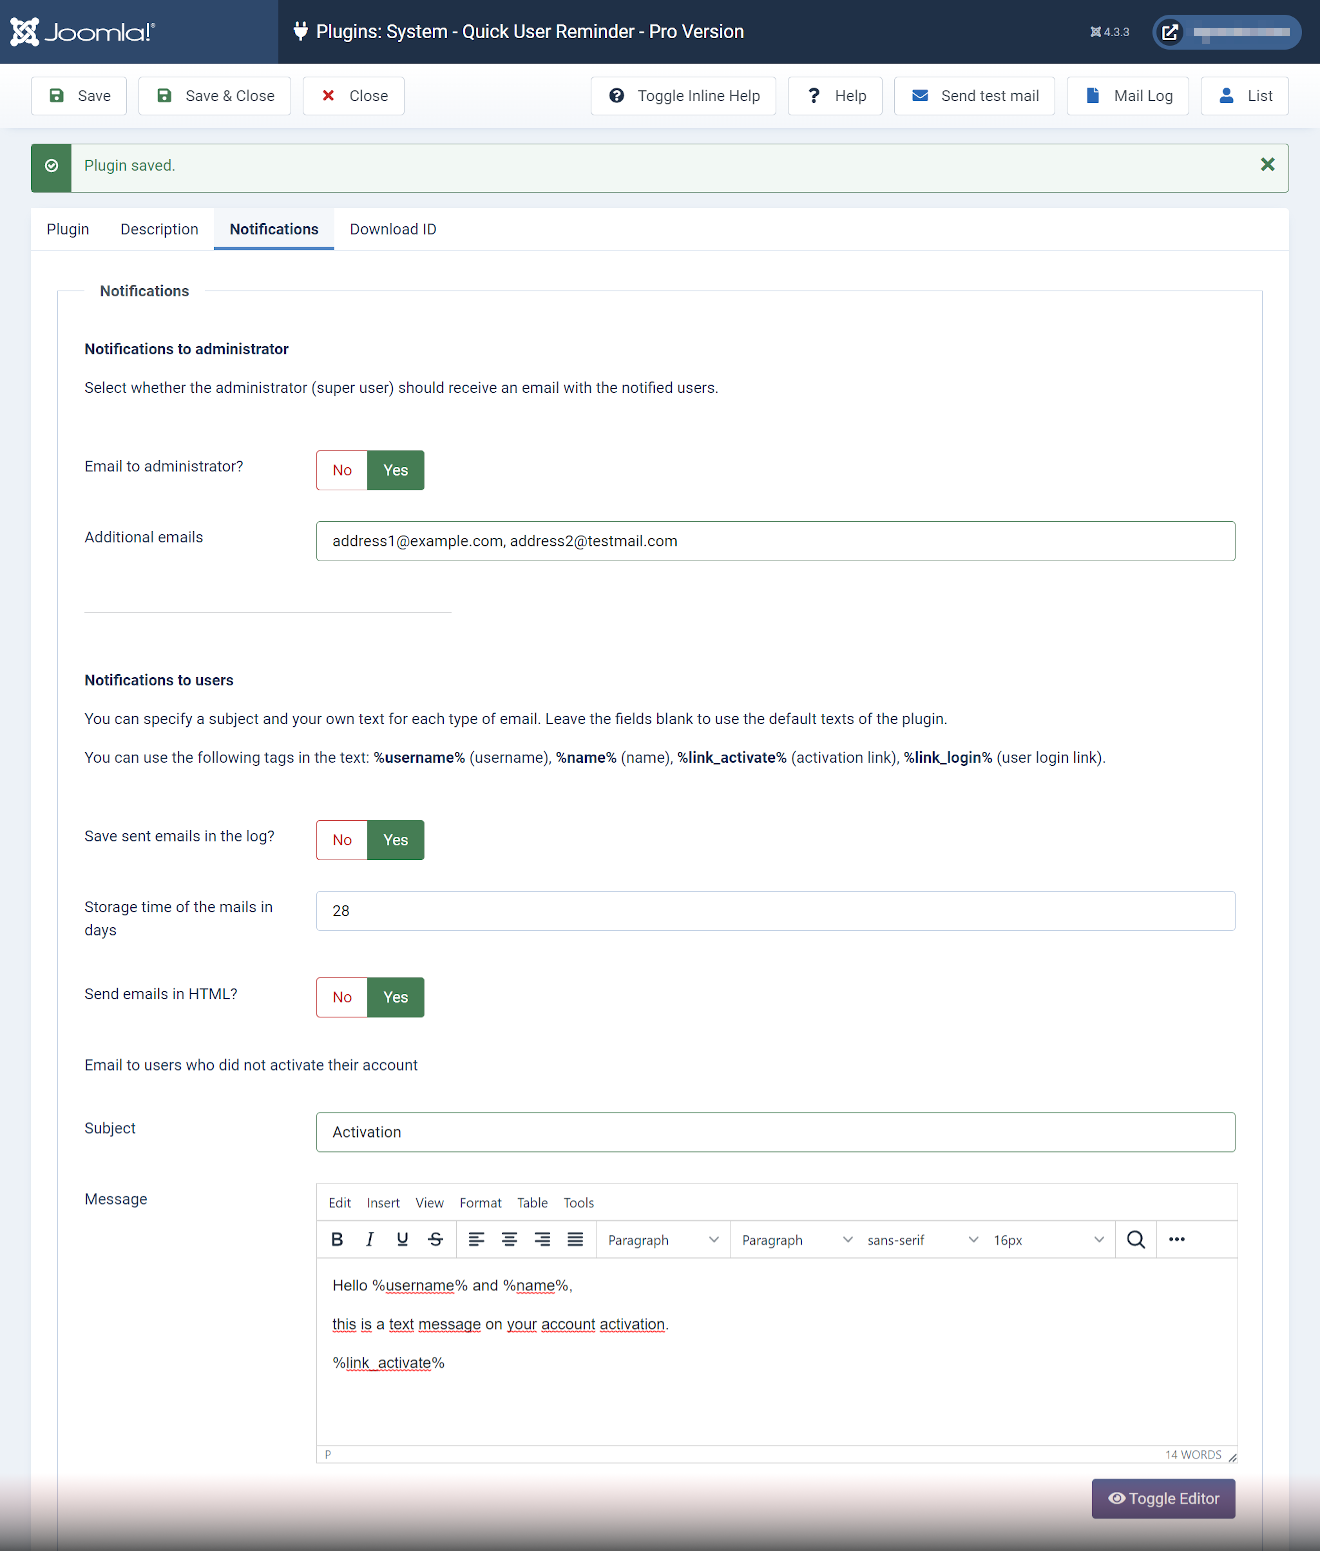
In this tab you can set up the notifications that will be sent to administrators and users if a "reminder" has been sent.

Notifications
If this option is activated, an information message with the notified accounts will be displayed automatically as soon as a trigger event (login) takes place. If this option is deactivated, you can view the users who have been notified in the maillog (if the 'Save emails in log' option is activated)
Notifications to administrator
Select if the administrator (super user) of the site should be notified via email when users have been notified.
Additional emails: You can enter additional email adresses to receive the information message.
Notifications to users
Here you can enter different subjects and message texts for each type of accounts. If you leave the fields empty the users will receive a default message that is stored in the plugin's language files.
Using tags: You can use the following tags as placeholders for certain variables in the textfield of each email: %username% (username), %name% (name), %link_activate% (activation link), %link_login% (user login link).
The tags are currently only supported in the message, they have no effect in the subject.
Send notifications to users? If this option is disabled, users will not receive notifications. You should not disable these notifications unless you only want administrators to receive notifications.
Save sent emails in the log: If activated, the sent notifications are saved in the email log.
Mail storage time in days: Enter how long the mails are being stored in the log. After the period has expired, the mails are deleted automatically.
Send emails in HTML format: Choose whether the emails should be sent as HTML or standard mail. If you enable HTML mode, the Joomla text editor will be used for input.
6. Sending test mail

You can send test mails to the admin account to see the mails users will reveice. Use the button Send test mail in the top bar to send an email for each type of account to the administrator. If the fields subject and message are not being filled out, the standard mails are being send. Tags inside the message fields are not being replaced by user variables and will be shown as entered (e.g. %username%).
7. Mail Log *
Click on the 'Mail Log' button to view the sent emails. You can clear the log manually at any time using the 'Clear Maillog' button; otherwise the entries will be automatically deleted after the number of days set in the tab 'Notifications'.
Please note that the option 'Save sent emails in log?' must be enabled for messages to be saved in the log.
8. List *
Click the 'List' button to get a list of all accounts that can be notified. If the list is empty, there are no notable user accounts.
Use the'Remind users' button to manually notify the accounts shown. This method works regardless of the option selected under 'Plugin Trigger'. However, if 'manual' is selected, the notifications must always be sent using this method, since the plugin then does not work automatically.
9. Download ID *
If you purchased the pro version of Quick User Reminder please enter your download ID to get updates through the Joomla update system.
10. Uninstalling the plugin
To uninstall the plugin go to System and klick on Install → Extensions then choose Manage Extensions in the top bar. (in Joomla 3 use: Extensions → Manage → Manage) Select the plugin and click on uninstall to delete the plugin.
11. Troubleshooting
Please make sure that user registration is activated in Joomla (Configuration → Users). There are extensions (e.g. EasySocial) that allow users to register via their own component. In this case, however, the core functions of Joomla are disabled and activation of the user account via the email sent by Quick User Reminder is not possible.
12. Support
If you need help, contact me via support ticket. Log into your user account and select Support from the top menu. You will receive an answer from me as soon as possible.
* only available in pro version


