")
")
Status: 7 Dec 2025, Smart Redirects, Version 1.0.0
1. Introduction
Smart Redirects is a powerful component for Joomla! version 4.4 and higher, enabling flexible and intelligent redirects. Unlike simple redirect solutions, Smart Redirects can also redirect existing pages, log 404 pages and create new redirects directly from them, as well as record redirects and more.
This makes Smart Redirects ideal for marketing campaigns, A/B tests, language redirects, SEO optimizations, or dynamically rewriting special URL structures. Redirects can be created and managed in a clear and structured way.
2. Requirements
Smart Redirects is a Joomla extension and therefore requires a functioning Joomla installation.
Technical requirements:
- Joomla! 4.4+, 5.x, or 6.x
- PHP 8.1+
- MySQL/MariaDB standard configuration
- Administrator access required
3. Installation & Update
When you download Smart Redirects from my website, you receive a file named pkg_smartredirects_VERSION.zip. VERSION refers to the current version of the plugin.
- Log in to the backend of your Joomla installation as a Super Administrator.
- Go to System and click Install → Extensions.
- Drag the file into the upload area or select it via the upload button.
- After the installation process is complete, you will be notified.
The component uses a system plugin to perform redirects. This plugin is installed and enabled automatically. If this does not happen, you will receive a message in the backend. Navigate to the plugin (System → Manage → Plugins), search for "System - Smart Redirects", and enable it.
If a newer version of Smart Redirects is available for download, Joomla will notify you in the backend. You can then install the latest version directly via Extensions: Update. Make sure you have entered a valid Download ID in the corresponding field. Alternatively, you can download the latest versions from my website and install them as described above.
4. Options
To configure the extension, open the Redirects page and click the Options button in the toolbar. You can now adjust various settings:
- Show statistics above the list: Choose whether a small statistics area should be displayed above the redirect list.
- Include query string in URL matches: When enabled, the complete URL including the query string (e.g. /foo?a=1) is compared with the “Source URL” field. Otherwise, only the path (e.g. /foo) is used.
- Normalize trailing slash: Enable this option if paths like /foo/, /foo, and /foo/// should be treated as identical.
- Count hits: When enabled, the hit counter is increased each time the redirect is triggered on the frontend.
- Debug mode (Super Users only): Enable this option to display a message in the frontend (when logged in as a Super User) showing which redirect rule was matched and executed.<

In the Updates tab, you will find the field Download ID. Enter the corresponding ID from your user account. If the ID is correct and you have an active Smart Redirects account, you can install updates directly in Joomla.
5. Creating and editing redirects
To set up a redirect, go to Smart Redirects → Redirects in the backend menu. You will then see an overview of all redirects you have previously created:
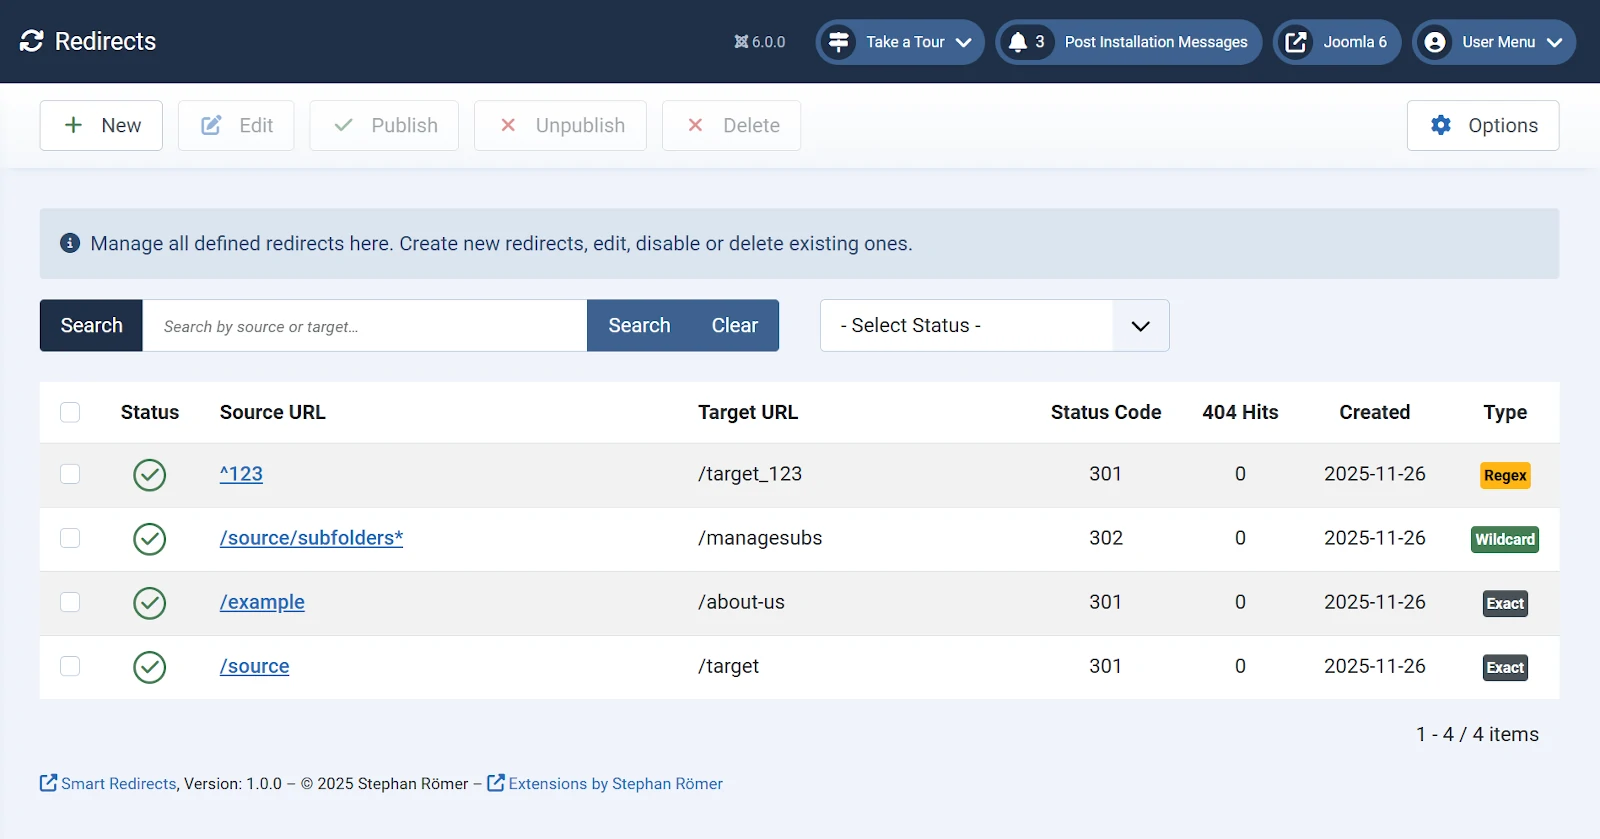
The list displays the following information for each redirect:
- Status: enabled or disabled
- Old address: the address to redirect from
- New address: the target address to redirect to
- Status code: the HTTP status code of the redirect
- 404 Hits: the total number of calls for this redirect. Note: the column label is incorrect and should be “Hits”; this will be corrected in the upcoming version.
- Creation date: the date the redirect was created<
- Type: how the redirect source is matched: Exact, Wildcard, or RegEx
You can use the search field above the list to search directly for specific redirects.
In the Status filter you can choose which redirects are displayed: published or unpublished.
5.1 Creating a new redirect
To create a new redirect, click the + New button. You will now see an input form where you can enter the required information:
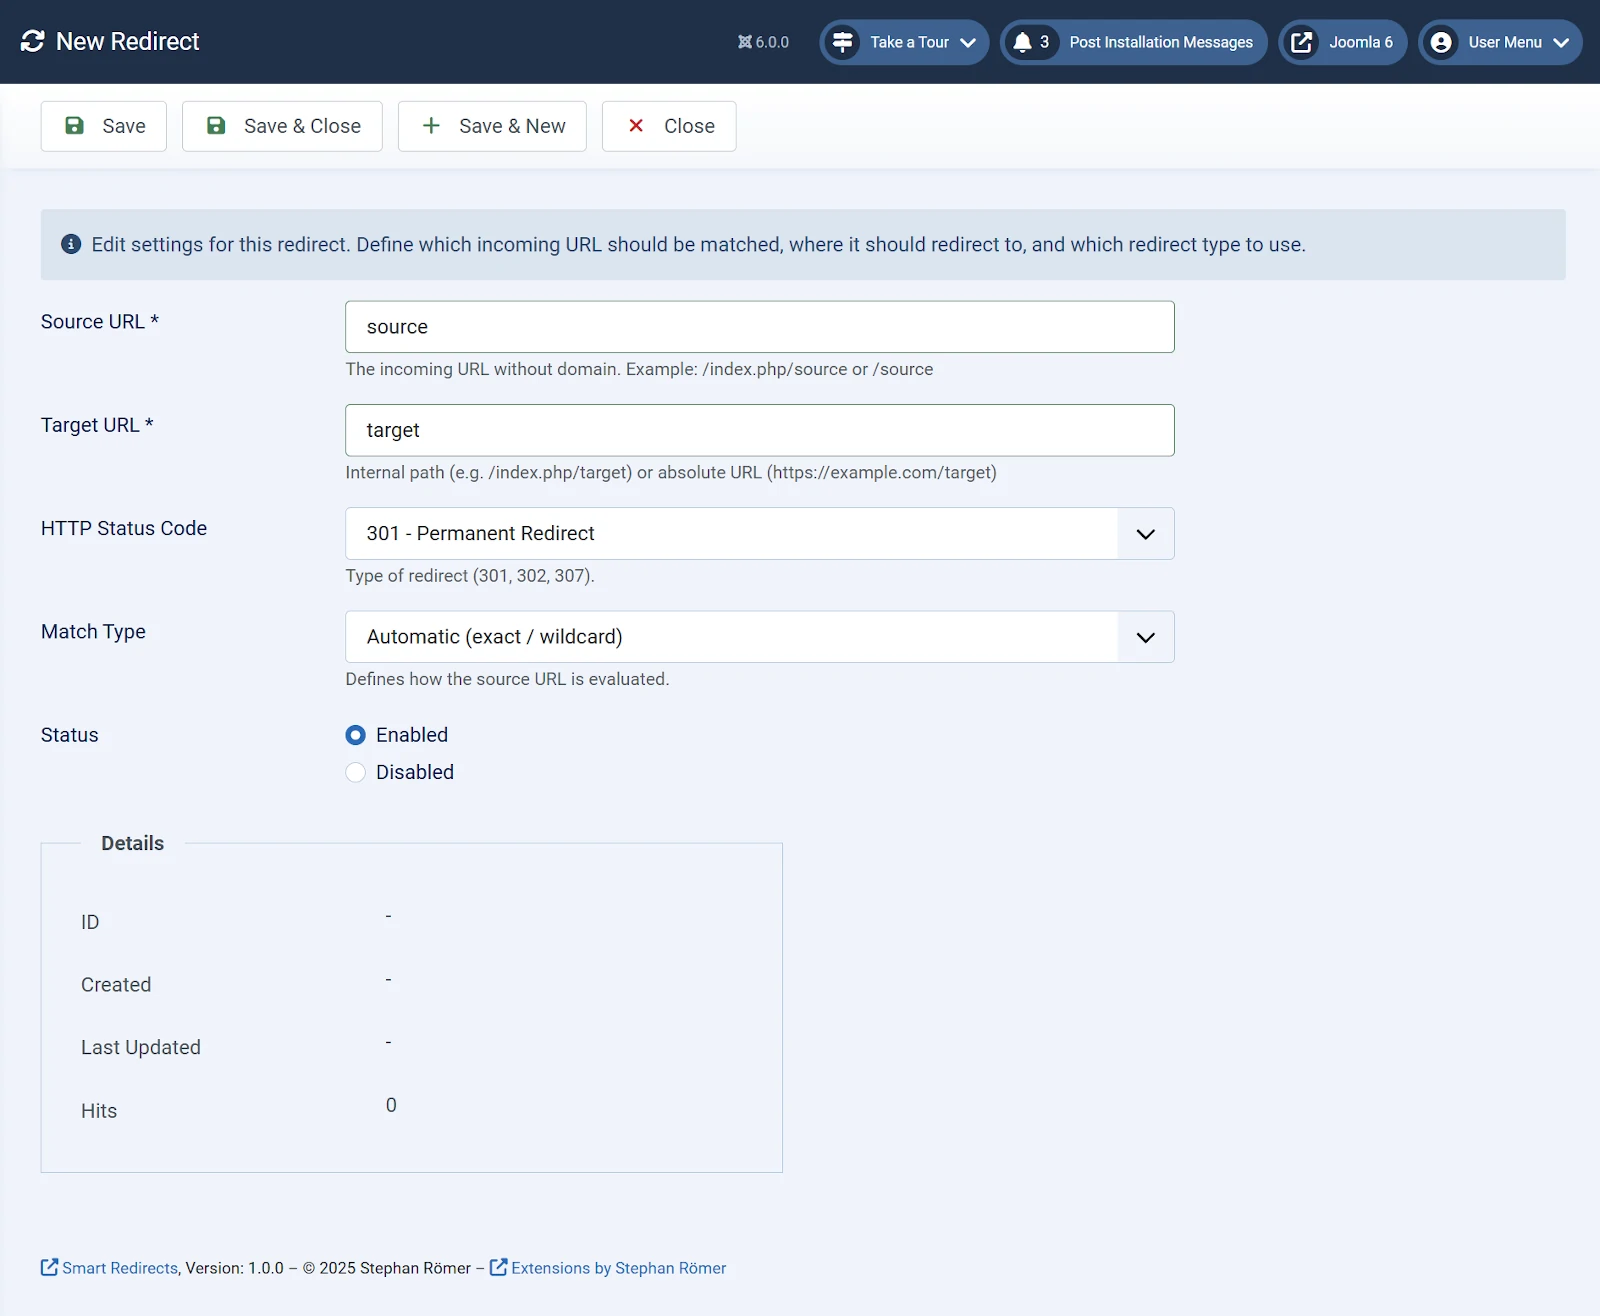
Source URL: The address that should be redirected (e.g. /index.php/source or /source). You can enter either an absolute or relative path.
Target URL: The address to redirect to (e.g. /index.php/target or /target). Also absolute or relative.
HTTP Status Code: Select the redirect type. The following codes are available:
- 301 – Permanent redirect
- 302 – Temporary redirect
- 307 – Temporary redirect (preserve method)
- 308 – Permanent redirect (preserve method)
- 410 – Content permanently removed
Status: Choose whether the redirect should be enabled or disabled. Redirects can also be toggled in the overview list.
Details (shown after the first save):
- ID: The ID under which the redirect is stored
- Created on: Creation date
- Last updated: Modification date
- Hits: The current number of hits for this redirect
Below “Created on” and “Last updated,” the user who created or modified the redirect is displayed.
When finished, click Save to store the redirect. Click Save & New to save and immediately create another redirect. Click Save & Close to save and return to the redirect overview.
5.2 Editing a redirect
To edit an existing redirect, click the entry in the Old address column. The input form (see 4.1) opens, allowing you to make changes. Save the changes by clicking Save.
6. Check
On this page, you can check whether a specific redirect already exists. Enter a relative or absolute path in the Enter URL field and click Test.
If the redirect exists, the result section will display the associated information such as match type, rule ID, status code, and more.
7. Log
The log contains all triggered redirects.

The table shows:
- Date: When the redirect was last triggered
- Old address: the source URL
- New address: the target URL
- Status code: the HTTP status code (301, 302, 307, 308, or 410)
- Type: How the source URL is evaluated (Exact, Wildcard, or RegEx)
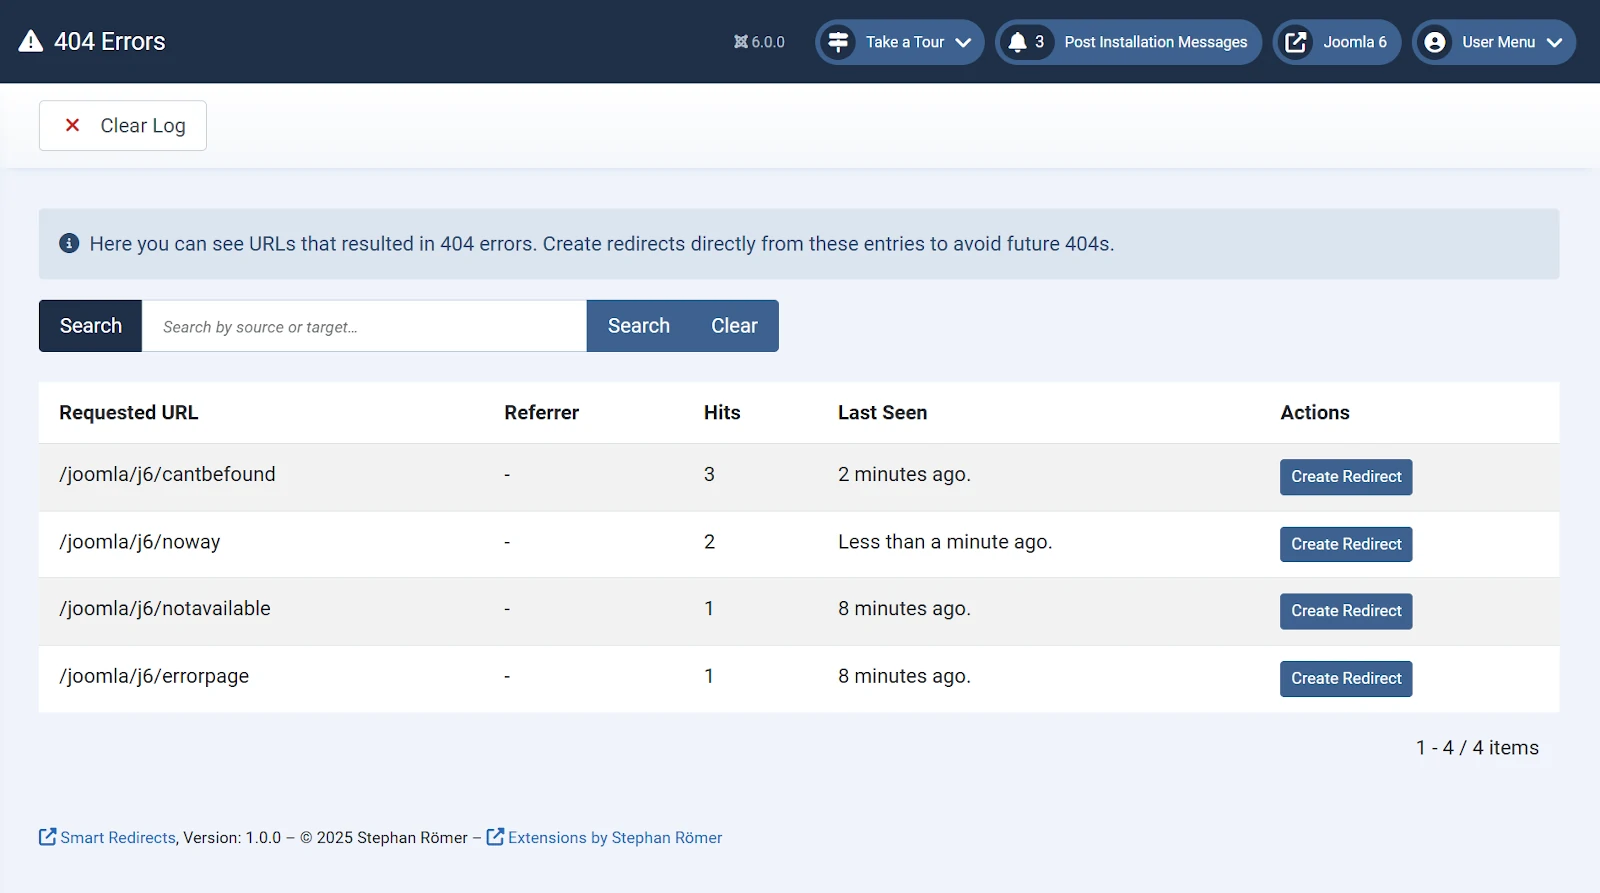
8. 404 Errors
This page shows an overview of all not-found URLs (404 errors). From these entries, you can directly create a new redirect using the Create redirect button to guide users and search engines to the correct page.
9. Uninstallation
To uninstall the component, go to System, click Install → Extensions, and then Manage Extensions in the top menu. Select Smart Redirects and click Uninstall to remove the plugin from your Joomla site.
10. Support
If you need assistance, open a support ticket. Log into your user account and select Support from the top menu. You will receive a response as quickly as possible.